How are facial and neck massage lines related to the beauty and tone of the skin? It's no secret that we all want to keep our facial skin smooth and elastic for many years. What do you need to know about the dependence of massage lines and facial muscles and how to use this knowledge for your benefit?
Can we harm our skin through wrong actions? We are not our own enemies, some will say. Of course, they are not enemies, but there are moments that can unnoticed play a cruel joke on our skin. Let's talk more about this...
Basic massage lines for a facelift
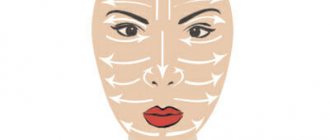
Massage lines of the face for tightening are the areas where the slightest stretching of the skin is observed. Massaging according to their location allows you to get excellent results, which include healthy and tightened skin, as well as a beautiful appearance of the oval face.
Facial massage for tightening is carried out along the lines of least stretch (massage lines)
In addition, special massage procedures can improve the characteristics of the skin and give it a beautiful appearance.
All massage lines on the face are divided into groups. Moreover, it is recommended to start massaging from a strictly defined area.
Massage chin lines for self-massage
On the chin, massage lines are located from the center to the sides and to the upper zone. It turns out that when performing a massage, the oval of the face is outlined, movements are made towards the ear zone.
It is important to know! Self-massage of the face should be carried out from below, from the chin area. In addition, to avoid the appearance of a double chin, it is necessary to make patting movements in the area where it occurs.
Self-massage of the face must begin from below, from the chin area
Cheek massage lines for self-massage
Facial massage lines for lifting in the cheek area are located from the corners of the lips to the ear area, from the nose to the edge of the face. Do not forget that they are not straight, but have the shape of an arc, located from bottom to top. When performing self-massage, it turns out that it is necessary to slightly lift the skin.
When carrying out a massage procedure after the chin area, it is necessary to proceed to the cheeks and cheekbones. Movements should be gentle, not forceful, so as not to damage the skin.
Location of massage lines on the face
Nose massage lines for self-massage
In the nasal area, the massage lines are located from bottom to top. Therefore, massage movements must begin from the tip to the bridge of the nose, as well as from the wings to its back.
Note! Despite the fact that the skin on the nose is not prone to stretching, it is still better to carry out an independent massage along the lines to tighten from bottom to top. It is following the recommendations that will allow you to get healthy facial skin, and massage treatments will be effective and efficient
Forehead massage lines for self-massage
Massage lines on the forehead are from the center to the temples. Therefore, smoothing movements should be carried out strictly in this direction. Also, massage lines are located from the eyebrows to the hair growth area strictly vertically.
It is necessary to start an independent massage with smooth smoothing movements, and it is also important that all muscles are in a calm and relaxed state. When performing massage movements, there should be no wrinkled folds on the forehead
Massage lines of the eyes and eyelids for self-massage
The skin in the eyelid area is very delicate, so it must be handled with extreme care and caution. Do not stretch the skin in this area
During the massage, she should be in a calm state.
Eye and eyelid massage is performed according to the following rules:
- in the area of the upper eyelid, the lines are located from the inner corner to the outer; when performing a massage in this area, it is necessary to lightly tap the skin in this direction;
- massage movements along the lower area of the eyelid involve smoothing movements from the outer area to the inner;
- You need to finish the massage by lightly tapping the outer corner of the eye.
Sequence
The self-massage procedure should begin from the neck:
- Tapping with fingers (3 times).
- Light circular pressure (3 times).
- "Finger shower"
- Stroking movements upward , in the direction of the line.
- Alternately, with the fingers of your right and left hands, knead both sides of the neck from bottom to top several times.
- Finish the massage with light sliding movements from bottom to top.
Chin area:
- Massage movements from the bottom of the chin, along the contour line of the face and to the earlobes.
- From the middle part of the chin to the earlobes, repeat as the previous cycle.
Area above the upper lip:
- your middle fingers to massage from the middle part to the corners of the lip, then use 2 fingers (tapping, pressing) to massage the line from bottom to top;
- The end of cycle a is by pressing in the corners of the lips.
Area of expression wrinkles:
- Use your middle fingers to walk along the nasolabial folds (pressing, tapping and vibrating about 3 times).
- The end of the cycle is pressing along the folds from the lips to the nose, from bottom to top.
Nose:
- pressing movements in a rounded manner with the middle fingers - kneading the wings of the nose: from the bottom to the tip.
- Light pats (up and down, 2 times).
- The end of the cycle is smoothing with the tips of all fingers from bottom to top.
Cheek area:
- Apply pressure along the jawline along the contour of the face and up to the earlobes with 4 fingers of both hands.
- the surface of both palms from the cheeks towards the ears.
- After warming up the skin, perform effleurage, indentation, and “finger shower” from the bottom of the face along the middle and upper parts, without touching the skin under the eyelids.
- At the end of these cycles, apply pressure to the earlobes, the center of the auricle and the temples.
Areas of skin around the eyes:
- Movements are carried out , starting from the inner corners of the eyes to the outer ones, with circular tapping, patting and vibration.
- Kneading the “crow’s feet” area (pressure, vibration) – 4 up and the same amount down. If there are deep wrinkles, it should be repeated several more times.
- end this cycle with stroking: combine your middle and index fingers and apply them to the inner corners of your closed eyes. Hold this position for 3 seconds.
- Use your fingers to draw a line from the upper eyelids to the outer corners , hold the position for 3 seconds. Next, from the outer corners of the eyelids, use light sliding movements along the lower eyelids, stop at the inner corners of the eyes, and also linger. This exercise will help relax your muscles.
Bridge of nose and forehead:
- Alternately, from the back of the nose , across the bridge of the nose and to the hairline, move the index fingers of both hands (9 times).
- The same movement of the fingers from the back of the nose to the hairline, then from the border of the hair to the temples.
- the surface of the palm onto the forehead and perform 3-4 times.
- Changing the palms of both hands, move from the eyebrows to the hairline of the head, using stroking movements.
- Perform tapping with three fingers of both hands from the middle of the forehead to the temples, followed by rubbing and “finger shower”.
- End the cycle by kneading with both palms from the bridge of the nose to the hairline.
Face oval:
- In order to prevent the formation of a double chin , it is necessary to make “mill” movements with the backs of both hands, starting from the middle and moving to the right, then with continuous movements to the left.
- Massage and knead from the hollow of the chin to the earlobes.
End of the massage:
- Alternating all mechanical movements during facial massage (2-3 times).
- End of the massage - warm palms clasp your face, fingertips are on the eyelids. Relax and feel warm.
How to properly care for your face
Knowing the layout of massage lines on the face, you can do self-massage. This procedure will restore youth and beauty to the skin, make it elastic and toned, smooth out facial contours, remove bags, blue circles under the eyes and pastiness.
For those who are going to do self-massage for the first time, it is better to do several sessions while sitting on a chair and looking in the mirror.
Self-massage:
- Starting position - sitting on a chair, body straight, back resting against the back of the chair, shoulder girdle straightened. Before the massage, you need to wash your face, remove decorative cosmetics, and apply moisturizer to your face, neck and décolleté. You need to gather your hair with an elastic band, and it is best to tie your head with a scarf or put on a shower cap so that the curls do not interfere.
- The fingertips should be lubricated with vegetable oil, so they will glide better. All movements during the procedure must be carried out with both hands simultaneously. You can touch your face only along the massage lines; the skin should be slightly pressed, but under no circumstances should it be pulled.
- The massage is done with three fingers: index, middle and ring fingers, joined together. Not the whole palm touches the face, but only the fingertips.
There are three stages of self-massage:
- Stroking along skin lines.
- Spiral rubbing along massage lines.
- Light patting with pressure with your fingertips.
You can only touch the eye area with your ring finger or little finger, as they are the weakest. You just need to tap them a little in this area along the massage lines.
The duration of the procedure is about 15–20 minutes. For the first couple of months, self-massage can be done every day, then reduced to 2-3 times a week.
After the session, you must apply a nourishing product. After the procedure, circles and bags under the eyes will disappear, puffiness will subside, skin tone will improve, and a healthy glow will appear.
Contraindications to self-massage of the face
Despite the great benefits that the procedure brings, it also has contraindications. Therefore, before carrying out, consultation with a specialist is necessary.
Contraindications are:
- Skin diseases, including psoriasis, acne, seborrhea, eczema.
- Predisposition to vasodilation.
- Arterial hypertension.
- Oncological diseases.
- Various skin injuries: burns, cuts, injuries.
- Recent rhinoplasty: At least one month must pass after surgery.
- Colds: it is better to postpone the procedure until recovery.
- Infectious diseases of the skin.
Vacuum
Carrying out a facial massage for wrinkles using vacuum technology requires the use of silicone, latex or rubber cups. It is more convenient to use silicone jars, because... the material is less damaging to the skin and is easily cleaned of oils. To work on the eye area and nasolabial folds, jars with a diameter of 11 mm are used, for working with the cheeks - 22 mm, and for working on the forehead and décolleté, jars with a diameter of 33 mm are used.
Cups are passed along massage lines using a large amount of cream. In order for the skin to get used to the load, the first sessions should not exceed 5 minutes. Gradually the processing time is increased to 10 minutes. The pressure increases gradually, and any sudden movements are prohibited. If the rules are not followed, bruises, stretch marks and ruptured blood vessels may occur.
Types of facial massagers
Depending on the desired result, as well as the initial condition of the skin, cosmetologists recommend using various types of hardware massage.
The easiest to use at home:
Roller massager. It can be wood, plastic, silicone or jade.
This type of mechanism involves rotational movements aimed at smoothing wrinkles and improving lymph flow.
- The vacuum massager works using rarefied air, which helps remove waste and toxins from the body and improve the regeneration of skin cells.
- An electric massager is considered the most versatile device due to the option of changing attachments.
Depending on the desired result, you can use attachments for ultrasound, laser or pulsed exposure.
An oxygen or ionic massager can enrich facial skin with oxygen, speed up cellular metabolism and improve overall appearance.
The principle of operation in this case involves the impact on the skin of ultrasonic vibrations, which can normalize hormonal levels and the functioning of the sebaceous glands.
A laser massager is used to tighten the skin, eliminate freckles, age spots, and acne marks.
The laser increases the production of collagen and elastin, which are responsible for the youth and beauty of the face.
The pulse massager works by exposing the skin to small pulses of current.
Its use is recommended for people who have problematic skin, signs of premature aging, or those who seek to improve their complexion and get rid of swelling.
A specialist will not only determine the presence of potential barriers to the use of facial massagers, but will also help determine the type of massage, its intensity and duration.
Anatomical features of the neck
To understand how to properly massage the neck, it is not enough to master the basic techniques under the guidance of an experienced master; it is also important to have an idea of the structural features of the massaged areas. Do not forget that the neck is connected to the head through a complex joint between the occipital bone and the first two cervical vertebrae. It is in this joint that the greatest range of movements occurs
The skin of the anterior-lateral sections of the neck is tender and easily moves; in the back of the neck it is rougher and less mobile. All major muscles in this area are well palpated
It is in this joint that the greatest range of movements occurs. The skin of the anterior-lateral sections of the neck is tender and easily moves; in the back of the neck it is rougher and less mobile. All major muscles in this area are well palpated
Do not forget that the neck is connected to the head through a complex joint between the occipital bone and the first two cervical vertebrae. It is in this joint that the greatest range of movements occurs. The skin of the anterior-lateral sections of the neck is tender and easily moves; in the back of the neck it is rougher and less mobile. All the main muscles of this area are well palpated.
Large blood and lymphatic vessels, as well as cervical and supraclavicular lymph nodes, are located superficially here. This should be remembered when controlling the force of impact.
Procedure
When performing cosmetic procedures, such as cleansing and moisturizing, strictly follow certain lines. Such lines are called massage lines; they have the least effect, which stretches the skin. If you follow this massage correctly, you can avoid many undesirable consequences such as sagging skin, fine wrinkles and restore a healthy complexion.
Facial massage lines are divided into specific areas:
- chin;
- nose;
- cheeks;
- forehead;
- eyelids and eyes;
In addition to these main lines, there are others, such as the cervical lines. But often, women forget to take care of this part, and in vain. After all, the skin of the neck can most accurately determine the age of the female part of the population.
Application of oils
Essential aromatic oils are in abundance today. And if the patient does not have an individual intolerance to this category of drugs, then it is worth using them when carrying out a healing procedure
. For example, the oils of St. John's wort, immortelle, sage, celandine and others contain antibiotics.
But such cosmetics have not only bactericidal and antiviral properties. Essential oil dilates coronary vessels, improves blood circulation, stimulates breathing, stimulates the central nervous system
. In addition, a pleasant smell during a massage is an additional relaxation.
.
Doing facial massage correctly: everything about massage lines and points
It has long been known that any cosmetic procedure, be it applying a cream or mask, scrubbing or cleansing the skin, is performed strictly in a certain direction - along the main lines. Facial massage lines are the lines of least stretch of the skin. By massaging them, you can not only tighten the oval of the face and make the contour more expressive and beautiful, but also improve skin color, as well as get rid of many other problems (wrinkles, acne).
But failure to follow the recommendations of cosmetologists and massaging the face, as they say, “at random,” can, on the contrary, aggravate the situation. Swelling will appear on the face, the skin will sag and become covered with a network of wrinkles. Therefore, remember that massage should always be performed along certain lines. What are these lines? Read about it below.
Direction of lines
The skin stretches unevenly in different directions, so you should follow the massage technique quite accurately to prevent skin sagging.
There are several directions of lines for facial massage:
- The massage starts from the base of the neck and extends up to the chin.
- From the middle of the chin on both sides of the face and up to the earlobes.
- From the middle part of the upper lip to the tops of the ears.
- From the bridge of the nose along the back of the nose to the very tip.
- From the middle of the forehead to the temples.
- The eye area is warmed up with circular movements.
- Lightly pinch from the eyebrow area to the bridge of the nose and temples.
You can follow these directions of the skin not only when performing a massage, but also during any cosmetic manipulation (applying cream or scrubbing).
In addition to the existing lines, there are also massage points. Massaging them regularly improves blood and lymph flow, which ensures stable functioning of internal organs and oxygen flow to cells.
Origin of facial massage lines
The human face has a complex structure; it consists of several types of tissues that perform different functions. They contain blood and lymphatic vessels through which oxygen and nutrients enter the cells and waste products are removed.
The localization of massage lines depends on the location of the main lymphatic vessels. Circulating through the vessels, lymph delivers useful elements to cells and removes excess fluid and under-oxidized products from them. The appearance of the face directly depends on how well the lymph performs this function.
With stagnation of lymph - lymphastasis - bags and bruises appear under the eyes, the complexion deteriorates, pastiness is observed, the skin loses turgor and elasticity, and becomes flabby. By touching your face along massage lines, you can eliminate lymphastasis, which has a very good effect on your appearance.
Massage lines and cream application techniques are interconnected. Therefore, all cosmetic procedures performed along the lymphatic vessels have a stronger effect.
Of course, if you apply creams randomly, this does not mean that they will not work at all, but the result will be worse.
Applying cream
Even the most expensive cream becomes powerless if it is randomly distributed over the surface of the skin. Today you can purchase fast-acting serums and emulsions, which, according to manufacturers, will make your skin renewed, filled with radiance and beauty in a matter of minutes. The effect of the exposure will depend solely on you. Expensive care or medicinal cosmetics are created on the basis of active ingredients that begin to act only after entering the lymph. Only correct application of the langer will help speed up this process.
| Action | Description |
| Step 1. Cleansing. | Before applying the cream, the surface must be cleaned. Moreover, ordinary washing with water will not be enough. Cleanse your skin with gel or scrub. |
| Step 2. Toning. | The effect of water can be softened with tonic or milk. |
| Step 3. Apply cream or massage oils. | The product is applied along massage lines. To enhance the effect, you can do light tapping to increase blood circulation. |
The three-step process may seem time-consuming to some, but it actually takes no more than 3 minutes. At the same time, you should not rush: you should not apply the cream with fussy, fast, careless movements, because this can lead to early sagging and sagging. There is also no need to vigorously and quickly rub the product into your face, because this will not make it more effective. Moisturizing cream can be applied to slightly damp skin: this will reduce the consumption of the product and, on the contrary, enhance the effect. Night cream is applied a couple of hours before bedtime.
- What is the most effective remedy for acne and acne?
- Spinal anesthesia - reviews and consequences. How and when spinal anesthesia is performed and contraindications
- Royal pork - recipes step by step with photos. How to cook royally baked pork under a fur coat
Self-massage techniques for face lift
Skin tightening massage can lead to different results as it is performed using different techniques:
| Massage technique | Result |
| Classical | A general facelift is carried out, the color and condition of the skin improves, the contour becomes more expressive |
| Pinch | It is carried out to cleanse the face, remove pustules, acne and other defects, carried out strictly along massage lines |
| Japanese | Skin rejuvenation |
Each technique has its own rules for the procedure, which include some features.
Classic massage for face lift
The classical technique includes gentle stroking and light tapping on the skin. Also, to achieve the result, circular movements are carried out. The entire massage is carried out with your fingertips in the main directions of the lines.
Pinch facial massage
It is of a therapeutic type, carried out using special pinches, strong pressure and vibrations. It is better to carry out without applying additional products so that the components of the substances do not get into problem areas.
Technique for pinch facial massage
Japanese massage for face lift
Japanese massage is characterized by energetic movements along massage lines. The entire procedure is performed quite intensively; in some places, strong finger pressure on the skin is possible.
Japanese shiatsu acupressure for a youthful face uses pressure on the so-called “beauty points”
In addition, a feature of the technique is pressing on beauty spots and stimulating lymph flow.
The following beauty points are distinguished:
- point in the middle of the forehead (elimination of wrinkles);
- dots on the inner and outer corners of the eyes (getting rid of wrinkles associated not only with age, but also with the manifestation of emotions);
- near the eyebrows on the bridge of the nose (improves human health);
- on the temporal region (allows you to get rid of headaches and migraines);
- near the corners of the lips (prevent lips from drooping with age);
- under the lower lip (quick relaxation, cessation of excitement and nervous stress).
Massage techniques
There are three techniques used in massage:
- Effleurage is light and rhythmic tapping of the skin with your fingertips. Thanks to this effect, blood circulation improves, and the skin and muscles contract;
- Stroking has a calming effect and improves blood circulation. It is performed with the entire plane of the palm or only with the tips of the fingers;
- Patting, pressing, rubbing - perform very carefully, without unduly intense impact on the skin. The techniques are performed easily and without effort, otherwise bruising and stretching of the skin may occur.
How to use the massager yourself
To work effectively and safely with a massager when using it independently at home, you must follow the basic rules:
- Read the operating instructions for the device in detail before using it for the first time.
- When massaging the skin, do not stop at one point for more than 3 seconds.
- Make sure that when working on a specific area of the face, the massager has the appropriate attachment.
- Do not deviate from the massage lines.
- Do not put pressure on the massager.
- It is necessary to increase the duration of the massage gradually, starting from 3 minutes. (maximum – 20 min.).
- Avoid overheating of the massager and correct any existing malfunctions in a timely manner.
- Hardware massage should be performed 3 times a week at the same time (ideally 1.5 hours before bedtime).
If you have any questions about using the device, we recommend that you contact the device supplier or the esthetician who recommended the device. If the slightest discomfort or redness of the skin occurs, the hardware facial massage procedure must be stopped.
Cosmetic massage
In fact, for such a massage it is not at all necessary to go to a beauty center. It is quite enough to ask a friend, daughter or mother to make it for you. Undoubtedly, you can do it yourself, but in this case you will not be able to feel the guide lines so well. And it’s always more pleasant to completely relax and enjoy a pleasant massage. All movements are shown in the pictures.
- Gently pressing on the skin, fingers are drawn from the base of the neck to the chin. This exercise effectively copes with neck wrinkles and double chin (Fig. 5). Repeat the movement 10 times.
- With your index fingers, lightly press the point in the center of the chin. Then move in a circular motion along the cheekbones towards the ears (Fig. 6). Repeat the movement 5 times. Such stimulation has a good effect on the health and elasticity of the skin of the cheeks.
- The next exercise is complex. Use your fingertips to move from the base of the neck to the bridge of the nose. In this case, the areas of the mouth and nose are curved. Next, the fingers are spread towards the temples and corners of the eyes (Fig. 7). Repeat the exercise at least 6 times.
- Let's move on to wrinkles in the forehead area. They often form earlier than others, which is why they are very deep. Three fingers (middle, index, thumb) are placed between the eyebrows and, with moderate pressure, drawn up to the edge of the hairline. The same action is repeated in the direction from the eyebrows, only diagonally (Fig. 8). The exercise is repeated at least 10 times.
- Thumbs are placed in the center of the forehead. With light pressure, begin circular movements to the sides (Fig. 9). Repeat 10 times.
- From the center of the forehead, use the tips of the index fingers to make circular movements to the temples, and then to the middle of the cheeks (Fig. 10). Repeat at least 5 times.
- The pads of the index fingers are placed to the inner edges of the eyebrows. With slight pressure, they are carried out along the edge of the eye sockets so that they return to the starting point (Fig. 11). Repeat 5-8 times.
- The pads of the index fingers are placed below the bridge of the nose (on the hump) and drawn in a circular motion across the cheeks to the temples. Next - along the lower edge of the eye arches to the beginning of the eyebrows (Fig. 12). Repeat 5-6 times.
- We place the pads of our thumbs on the temples and, with slight pressure, move them along the cheekbones to the lips. After this, they move in a circular motion towards the bridge of the nose (Fig. 12). Repeat 6 times.
- Finish the massage by lightly patting the skin.
Daily facial skin gymnastics allows you to achieve incredible results. Regular stroking along massage lines helps reduce the number of wrinkles. In some cases, the skin becomes “younger” by 10 years. Take care of your beauty, it's so simple. To carry out such a massage, you do not need to go to expensive beauty salons.
Tuberculous lupus: causes and factors in the development of the disease, its types, routes of infection, signs of pathology, diagnosis and treatment, preventive measures
Gneiss: causes of development, symptoms and features of the course, diagnosis, treatment and preventive measures
Pyoderma: causes and signs of the disease, classification, diagnostic methods, treatment and prevention
Panaritium - causes and signs of the disease, its signs and types, methods of treatment and prevention
Pityriasis versicolor: causes and signs of the disease, diagnostic methods and treatment methods
Pityriasis rosea or roseola rosea: causes, signs, diagnosis and treatment
Lichen planus: causes and types of disease, methods of diagnosis and treatment, prognosis
Ecthyma: causes and signs of the disease, risk flus, diagnosis and treatment
Melanoma: causes of neoplasm, classification, diagnosis and treatment
Rhinophyma: features and signs of the disease, its causes and forms, diagnosis and treatment
Why follow the order of movements?
The importance of following massage lines when applying cream, self-massage, and using a massager is to increase the likelihood of multiplying the desired effect.
For example:
| External conditions | The result of observing the direction of facial massage lines |
| Application of cream (regardless of the purpose of the cosmetic product and its structure) | Nutrients from the applied composition are absorbed faster and better, which triggers the process of natural regeneration of the skin, its moisturizing and smoothing. |
| Self-massage | Blood flow is stimulated and blood circulation in the affected area is significantly accelerated. This helps to tighten the oval of the face and improve the color of the skin itself (it takes on a pinkish tint, dark circles under the eyes disappear, pigment spots become less expressive). |
| Using the massager | Biologically active points are stimulated by a “smart” mechanism, which leads not only to a significant improvement in the condition of the facial skin, but also to the normalization of the functioning of vital organs. |
Cosmetologists recommend undergoing a similar procedure with a specialist before working on the skin yourself. This will help determine the required degree of intensity of exposure, as well as the most “problematic” areas of the face.
It is important to follow basic hygiene rules and wash your hands thoroughly before self-massage of the face, neck and décolleté to avoid infection or contamination of the pores with further provoking the appearance of rashes.
Contraindications
Facial massage (reviews and results of the procedure are mostly positive) also has contraindications.
It cannot be carried out when:
- elevated body temperature;
- the presence of chronic pathologies in the acute stage;
- violation of the skin in the affected area;
- poor blood clotting;
- herpes, eczema, pyoderma;
- increased fragility of blood vessels;
- numerous moles and papillomas;
- oncology of nearby organs;
- acute neuritis of the facial nerves;
- acute sinusitis.
Movement 7
Run your fingers several times along the back of your nose from bottom to top, then across your forehead, and then over your head. Stroke the eyebrows, moving from the bridge of the nose towards the temples. With your right hand, stroke yourself from the middle of your forehead to the left, and with your left hand, from the middle of your forehead to the right. Repeat movements 3-4 times.
With your left hand, stroke your right cheek from bottom to top, and with your right hand, stroke your left cheek. Perform this movement 3-4 times as well. Then lift your chin and make stroking movements from top to bottom along the neck, using the opposite hand on each side. Repeat 3-4 times.
Finally, close your eyes and lightly stroke your face from bottom to top, and then move on to stroking movements of your head.